The Nuffnang logo is apparently a simple body figure shouting, whitish in colour. Its background is gradient blue. The logo is then outlined with black to create a nice cartoon effect.

We will create a similar logo but more different looking and in our own style instead.
Steps
1. First, select the Rounded Rectangle Tool. Hold Shift and drag it across your canvas to make a rounded square.
2. Select the Magic Wand tool to select the square you just made.
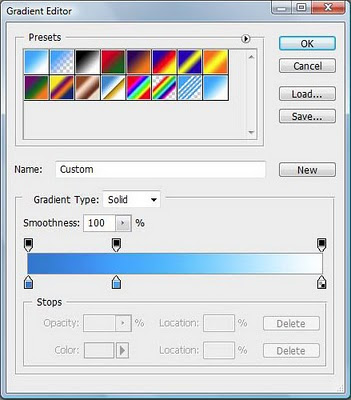
3. Select the Gradient Tool and click on the gradient to edit it. Do the following.

Click on the bottom part of the gradient bar to add a colour. In the picture above, there are 3 points. The first point being a darker blue (007bd1), the 2nd being a lighter blue (00a8ff) at 30% and last one being white.
Drag to colour the square. You will get something like this.

4. Now select the Text Tool and use Verdana. Make your font bold and put a "N" in your square. Pick a nice brighter colour so your letter can be seen. In my case, I made the letter jutting out of the square to make it look nice.
I then added white letters, "EXUS", to show that my example company's name is Nexus. It can be a shape instead of letters too.

5. As it seemed a little too blank, I selected the Custom Shape Tool and selected Ornament 1 to draw at the bottom part of the square. I also made it a little big so it sticks out from the square for some style.

6. Lastly, merge all layers together. Right-click on the layer and apply Stroke with 5 pixels and coloured black.

If you do not like the colour blue, you can also use Hue to adjust the colour you like. You can also add in different shapes or texts and even colours depending on how you want your logo to be.
A good way is to add Drop Shadows and greyish gradients to make the elements in your square more attractive.
Love,
Nicholas.
